Thursday, June 23, 2011

Banana Pudding with Nilla Wafers

The first time I ate this banana pudding, I ended up about an hour into the wrong part of Brooklyn. I was so focused on the pudding that I didn't notice when the train I was on went over the East River instead of under it, or when I missed the last stop where I possibly could have transfered to a train traveling the right direction. That's how good this pudding is. (Let's leave aside the fact that I have no sense of direction). 
The fateful day when I was introduced to this pudding was also my first day of work ever in NYC. Now, again, I work quite nearby the source of this delightful pudding (Magnolia Bakery). I think about it all the time. Sometimes I wish I could just eat this for lunch. And dinner. And breakfast. And, of course dessert. Really, it's that good. You have to try it. And then, if you're in NYC, you need to go to Magnolia Bakery and try it. (Plus, you'll look less like a tourist if you aren't in line for the cupcakes only...)
Banana Pudding with Nilla Wafers
From the Buttercup Bake Shop Cookbook
By Jennifer Appel of Magnolia Bakery and Buttercup Bake ShopAdapted slightly by Alexandra Rogers


Ingredients


1 1/2 cups cold water
1 (14-ounce) can sweetened condensed milk
2/3 cup instant vanilla pudding powder
3 cups heavy cream
1 box Nilla wafers
6-8 medium bananas, peeled and sliced
8 16 oz. cups

Recipe
On the low speed of an electric mixer, blend the water, milk and pudding powder until thoroughly mixed, about 1 minute. Refrigerate for at least 4 hours (or overnight) until firm.
Blend water, sweetened condensed milk and pudding powder together until mixed thoroughly, on the low speed of an electric mixer (about 1 minute). Refrigerate the pudding mixture for at least 4 hours, until firm. If you like, this can be left overnight.
In a separate bowl, preferably another electric mixer bowl, whip the heavy cream until soft peaks form (about 6-7 minutes). Soft peaks have formed when you remove the beaters from the bowl and the mixture forms little peaks at the end of the beaters, but soft, wilting little peaks. (See image from fitsugar, below, for guidance).
Gently fold the pudding mixture into the whipped cream until well incorporated. I like to use a rubber scraper and try to incorporate as much air into the bowl as I can while I mix. 
In a large bowl, or (as I prefer) several small glasses, layer nilla wafers, pudding mixture and bananas. Layer until cups are full and pudding is gone and decorate with crushed nilla wafers on top. Refrigerate for about 60 minutes before serving. Serves 7-8.

Saturday, June 18, 2011

Museday #6 {Recipe for a Perfect Saturday}

1. Find a local market (I'm a big fan of Smorgasburg, in Williamsburg, Brooklyn)

 2. Engage with local vendors (Brown Butter BrooklynKumquat CupcakerySalvator Brooklyn, are among a few of my many favorites at Smorgasburg) and learn new things (like Market Share, a soon-to-be shared kitchen space, or Wellness In The Schools, an educational stand about a program that helps promote healthy food in schools in NYC).


 3. Eat super well (duh).
Fresh Squeezed OJ + Almond Croissant at Almondine

Almond Croissant at Almondine

Mini pies (that's a keylime-tequila pie with a corn chip crust in the back) from Brown Butter Brooklyn


Mini cupcakes from Kumquat Cupcakery--the Maple Pecan Bacon ones are delicious


4. Lay in the sun while you digest your meal. Possibly while reading a food-related publication.


5. If you can, take in a skyline...


Blueberry Upside-Down Cake

Although the weather has been swinging between rainy and grey and sunny and super hot here in NYC,   it feels--officially--like summer. And, as I might have mentioned before, I truly believe that upside down cakes are an official summer dessert.
This blueberry upside down cake is a Martha Stewart recipe (that version is a bit fussier than mine), though it was originally introduced to me by my boyfriend's mother (she also introduced me to that ever famous, well-loved goat cheese and prosciutto strata). She brought this blueberry upside down cake out for dessert one night when we were all gathered around an outdoor table, finishing a perfect grilled summer meal and overlooking a prairie. It was a picturesque summer night--one of those evenings where there's a slight breeze and everyone at the table is newly tan and happily exhausted from a day in the sun. Trust me when I say: next time you have a summer evening--you should really pair it with this blueberry upside-down cake. You should also throw some vanilla ice cream in the bowl. Here's wishing you one of those unforgettable summer nights soon...happy cooking!
Blueberry Upside-Down Cake
Adapted from Martha Stewart by Alexandra Rogers


Ingredients
4 Tablespoons butter, melted plus a little extra to grease the pan
1/3 cup + 3 Tablespoons light-brown sugar
1 1/2 cups blueberries, washed 
3/4 cup all purpose flour
1 teaspoon baking powder
1/4 teaspoon salt
1 large egg
1/4 cup milk, room temperature


Recipe
1. Heat oven to 350 degrees Fahrenheit and grease a bread loaf pan. Pour 2 Tablespoons of the melted butter into the bottom of the pan and evenly coat by tilting the pan in every direction.
2. Sprinkle 3 Tablespoons of brown sugar over the butter, on the bottom of the pan.
3. Pour 1 cup of blueberries over the loaf pan and set aside.
4. In a large bowl, mix flour, baking powder and salt. I find it's best to use a whisk to get some air into the mixture. 
5. In another bowl, place 2 Tablespoons of remaining butter and 1/3 cup brown sugar and the egg and milk, and beat together with a fork.
6. Add wet ingredients to dry ingredients. Mix until just combined. Do not over mix. 
7. Pour half the batter into the loaf pan. Sprinkle 1/2 cup blueberries over the batter and spread the remaining batter on top of that.
8. Bake for 35-40 minutes, until a knife inserted in the center of the cake comes out clean (without any doughy batter stuck to it).
9. Serve with vanilla ice cream, to up to 8-10 friends and enjoy outside on a summer evening.

Saturday, June 11, 2011

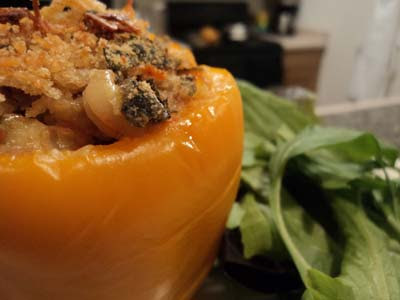
Spicy Orzo-Stuffed Peppers

Shockingly enough, I have yet to share with you my biggest secret to eating well on a busy schedule. Here it is: spend a weekend day cooking. Or even a weekend evening. If you spend a few hours prepping certain ingredients you can guarantee a tasty and healthy series of meals for the week ahead--even if the week ahead is a crazy one. These stuffed peppers are a great intro to that technique.
It's a soothing and fun dish to cook, too. You get to work with crisp bell peppers and fill them with a homemade pasta dish. Not to mention, the end result is spectacular. Think about pulling this out of the oven on a Tuesday night. Enticing, isn't it? 
Spicy Orzo-Stuffed Peppers
Adapted from Miranda Agee @Haute Headquarters, by Alexandra Rogers


Ingredients
2-3 Tablespoons oil (whichever kind you like, just not e.v.o.o.)--enough to coat a large pan
1 medium red onion, diced 
2 small zucchini, diced
1 (28 oz) can of diced tomatoes
2 teaspoons red pepper flakes
2 cloves of garlic, minced
1 cup orzo
6 small bell peppers, any color you like
1 cup vegetable broth
2 Tablespoons minced/torn basil
1/4 cup bread crumbs
1/2 cup parmesan cheese, freshly grated
2 Tablespoons extra-virgin olive oil


Recipe
1. Preheat oven to 425 degrees fahrenheit.
2. Pour vegetable broth into a pan that will fit all of your peppers, standing up, with room between them. Usually a cake pan works for this.
3. Wash your peppers and cut off the stem, discard the seeds, etc.--basically get them ready to be stuffed. Lightly salt & pepper the bell peppers and set them aside.
4. Combine bread crumbs, parmesan cheese and basil in a small bowl and set aside.
5. Place a large saute pan on medium-high heat. Once the pan is hot, add enough oil to coat the pan and toss in onions. The onions should sizzle a bit as they hit the pan. Cook the onions for 2-3 minutes until they are translucent. Once onions are translucent, add the zucchini (this should come out to about 3 cups of zucchini.) Give the whole mixture a stir or two and let cook for 5 minutes, until zucchini has shrunk down and the mixture is beginning to caramelize and brown. Do not stir frequently, as this will disrupt the caramelization process. Add garlic and red pepper flakes and cook for another 2 minutes. Throughout the process, salt and pepper each layer lightly.
6. Pour the entire can of diced tomatoes and juices into the pan and thoroughly combine with the zucchini and onions. Bring the mixture in the pan to a simmer, over medium-high heat and cook for 8-10 minutes or until the mixture has reduced and is no longer soupy. (You'll know it is ready when you move some of the mixture aside with a spoon and no liquid comes rushing in to fill the void.)
7. While your tomato mixture is simmering away, bring water to boil in a small pot. Cook the orzo for no more than 2 1/2 minutes. The orzo should be undercooked, since it will cook more while it bakes inside of the pepper. Once your orzo is drained, set that aside.
8. When the tomato mixture is ready, add orzo into the pan. Stir to combine, and add salt and pepper to taste. Your filling is now ready!
9. Fill each pepper to the brim with filling, then top off with a heart handful of the breadcrumb/parmesan/basil topping. Place the peppers in the pan with vegetable stock on the bottom and cover the entire thing securely in aluminum foil. This step is very important, because without it you'll have dishearteningly crisp peppers at the end of the cooking time.
10. Bake for 45 minutes without opening the oven. The peppers should be tender and pierced easily with a fork. Serves approximately 6, depending on the size of the bell peppers.

Wednesday, June 8, 2011

(Belated) Muesday

I know, I know, "Muesday Wednesday" doesn't work nearly as well as Muesday Tuesday. What can I say? I got a little busy. It happens to us all sometimes. That's why today's inspiration is this: restful cupcakes in the park. Or, the closest version of a park you can find.
These are photos of cupcakes from Baked by Melissa. If you live in NYC, or visit here anytime soon, check these out, the frosting is fantastic. 

Confession? I didn't share these. I ate three, by myself while sitting on a bench in Union Square. Because it's good to slow down and enjoy the scenery once and a while. And because there has never been anything bad about a cupcake. 
Plus, these are mini cupcakes. See? 
As I'm sure you know, a girl can eat at least four of these mini cupcakes and its just like eating one. Of course, eating multiple mini cupcakes in a row can be a slippery slope. Don't say I didn't warn you.

My point is, cooking is fantastic. I love it. If you're reading this blog, you probably love it too (or you love me and you're just being supportive). Cooking is a stress release for me and a good way to unwind. But every once in a while, eating mini cupcakes in a park...well, that's pretty great too. Enjoy the rest of your week!

Saturday, June 4, 2011

Toffee Cookie Bars

My mother discovered the recipe for these cookie bars when I was 10 years old. We took a road trip to Canada soon after and distributed them to my relatives as we met them. Now, more than a decade later, these bars are still mentioned at family visits. I kid you not. They have chocolate and toffee and nuts and cookie and caramel. What more could a (cookie-bar loving) girl ask for? 
This is one of those recipes that produces an easy take along item (hence the reason we brought them on a road trip to Toronto). These are great for bake sales, family reunions, treat days and of course (and most importantly), bribery. 
Toffee Cookie Bars
By Skor Toffee, Adapted by Alexandra Rogers


Ingredients
2 1/2 cups all-purpose flour
2/3 cup firmly packed light brown sugar
3/4 cup butter or margarine
1 large egg, slightly beaten
2 cups semi-sweet chocolate chips divided
1 cup coarsely chopped pecans
1 (14 oz.) can sweetened condensed milk
1 (8 oz.) package of milk chocolate covered toffee baking bits*
butter for greasing pan


Recipe
1. Preheat oven to 350 degrees fahrenheit. Grease a 9 x 13" baking pan and set aside.
2. In a medium container, mix chocolate chips and chopped nuts together. Set aside. Also set aside 1/4 cup of toffee bits.
3. In a large bowl, mix flour and sugar together. Add butter, chopped into tablespoon-sized pieces and smoosh it into the mixture with your fingers, until it resembles fine crumbs. Add the egg and mix well with a fork.
4. Stir 1 1/2 cups of the chocolate chip/nut mixture into the crumb mixture. Once thoroughly combined, reserve 1 1/2 cups of the dough mixture and set aside. Press the remaining crumb mixture onto the bottom of the 9 x 13" pan. Bake for 10 minutes.
5. Pour sweetened condensed milk over the partially baked crust, spreading with a spatula to make sure it evenly coats. 
6. Sprinkle toffee bits (everything you have except the 1/4 cup you set aside in step 2) over the layer in the pan. 
7. Sprinkle the reserved crumb mixture and remaining chocolate chip/nut mixture over the top. 
8. Bake for 30-35 minutes until golden brown on top. Sprinkle with the remaining 1/4 cup toffee bits.
9. Let cool, then cut into 1" x 2" rectangles and serve. Makes approximately 24 cookie bars.


*If you can find toffee baking bits that are not covered in chocolate, those would be better--and are what the original recipe calls for. I believe these have been discontinued because I haven't found them for years, but if you can find them, more power to you. Also, if you find them, will you please tell me where so I can go stock up? 
Related Posts Plugin for WordPress, Blogger...