Friday, December 30, 2011

Superfood Soup (Sweet Potatoes, Kale, Lentils)

Although a warming soup made of super foods needs little excuse, here are mine: I have a cold right now. It's winter. Oh, and also, we just got done with Christmas and are heading into a time of year where New Year's Resolutions (and a gym membership for this girl) are looming.  
Time for a super healthy soup. 
This soup is incredible. The three main ingredients kale, sweet potatoes, and lentils are all considered "super foods."I just don't think you can go wrong here. Low in fat, high in everything good. 
As an added bonus, this soup is fairly quick to prepare and incredibly simple. If you prep all the ingredients beforehand you really just have to throw things in and set a timer. Make sure to make enough for leftovers, as you'll definitely want them . The end result is garlicky, healing, and apparently--unlike most things I like when I'm sick--very, very good for you! 

Red Lentil Soup with Sweet Potatoes and Kale

By Jen, from Eating Clean
Ingredients
1 tablespoon olive oil

1 medium white or yellow onion, chopped
2 cloves garlic, finely chopped

5 cups water

1 cup red lentils, rinsed and drained

2 teaspoons sea salt

1 1/2 teaspoons ground coriander
1 1/2 teaspoons bittersweet paprika
3/4 teaspoon ground cumin
12 ounces fresh sweet potatoes, peeled and cubed (2 cups)
4 cups chopped fresh kale leaves (stems removed)
Freshly ground black pepper
Recipe
In a large pot or dutch oven, heat oil over medium heat. Add onions and cook for approximately 5 minutes. Next, add garlic, cooking for about 30 seconds and stirring to combine with onions. Add all spices and salt, stir to combine. 

Next, add lentils and stir to coat with spices, onions and garlic. Pour in 5-7 cups of water (depending on how thick you like your soup--add less water for thicker soup). Bring to a boil, then reduce to a simmer and simmer, uncovered, for 10 minutes. Add sweet potatoes and simmer until tender, about 10-12 minutes, then add kale and simmer for about 5 minutes. Crack fresh black pepper lightly over the soup and serve hot. 

Wednesday, December 14, 2011

{Holiday Gift Guide #1} For Foodies Who Love to Read

Happy holidays! Although I've been watching Elf and playing Christmas tunes since early November, it's finally time (for normal, non-Christmas-obsessed people) to deck the halls and laze around near the Christmas tree. I can't quite enjoy it all yet, since I'm approximately a week away from defending my masters thesis. But, as I often do in the middle of stressful weeks, I'm constantly dreaming of what vacation will be like. At the top of my list? Reading food publications, novels and cookbooks. While sipping hot cocoa. And listening to Christmas music. It is going to be great. 


If you've got a foodie friend (who is also a bookworm) like me, this gift guide will help you find the perfect reading material for them to unwrap on Christmas day.


Food Writing Publications
#1 Lucky Peach {Cost: $28 for the rest of the subscription, starting with issue 3}
From David Chang and Peter Meehan, a collection of food essays and recipes with personality. This is the hottest thing for foodies this year, for good reason.


#2 Food & Wine subscription {Cost: $20, annually}
A well-regarded food magazine that includes food trends, recipes and articles. Sure you can go online for the same content, but to some people (including me) nothing beats turning the pages of a magazine, and keeping the laptop closed.


Cookbooks
#3 Milk Cookbook {Cost: under $20}
Milk bar, Momofuku's creative dessert place in NYC, now has a cookbook. It's delightful, and combines recipes for crack pie and crazy cakes with quirky stories from pastry chef Christina Tosi.


#4 I'm Just Here For The Food, {Cost: under $25}
Alton Brown, per usual, provides a wealth of straightforward and incredibly useful information that results in better, more consistent cooking.


Novels
#5 Ruth Reichl Novels {Cost: approximately $10-$15/book}
Ruth Reichl is a mega-celebrity in the food world. Her novels give more detail on snippets of her incredible food-focused life, and include recipes at the end of each chapter. My favorites are: Comfort Me With Apples, Tender At The Bone, and Garlic and Sapphires.


#6 A Year in Provence, by Peter Mayle  {Cost: $10}
This is a classic novel for foodies--the story of a man and his wife who move to Provence and enjoy the good life. It seems like they eat most of the time, but they also leave the house to buy food and get to know the community. It is full of beautiful writing about a beautiful lifestyle. 

Monday, November 14, 2011

Golden Boy Pizza (North Beach, San Francisco)

Before reading the rest of this, remember: I don't do restaurant reviews. I do, however, give recommendations to other foodies. I can't help myself, because when I think things taste really, really good, I don't want you to miss them. And, apparently, I'm particularly passionate when it comes to pizza.

And we're back in. Remember when I went to San Francisco?
It is a very cool city, with a pretty skyline. As a New York girl at heart, though, I was a bit biased. Sure, I thought, it has a skyline. But does it have charming neighborhoods? 

Apparently, yes. It does. I am particularly fond of North Beach--it has an almost indescribable character. Since a picture is worth a thousand words, here's a picture from the parking garage my aunt and I parked in, when we spent an afternoon in North Beach. Every parking stall has fortunes and quotes--a daily dose of inspiration. I chose my favorite to share with you.
Since fortunes can sometimes act as self-fulfilling prophecies, we ended up exploring the culinary delights of the neighborhood soon after parking. My aunt and uncle had spent the weekend raving about Golden Boy Pizza, and I had to try it. 
People, this is show stopping pizza. It's really, really good. We got the fully loaded option, seen below. You're looking at cheese, tomatoes, mushrooms, zucchini, onions, and sausage. As a result of this slice, I was forced to add pizza to the list of things San Francisco is doing right. I had no choice.
In short, I've got two main points. First, if you're anywhere near North Beach, go to Golden Boy Pizza. Second, although I feel most at home in New York City, give me a skyline, and a neighborhood with personality and good pizza, and...I'm happy.

Have a great week, and expect some Thanksgiving side dishes in this space soon.

Friday, November 4, 2011

Zucchini & Chickpea (Quick) Curry

The Internet has significantly, and irreversibly, changed the way we communicate, share information, and ultimately, the way we live. It has also, seemingly, changed the way we cook. 

In Tweet Me Right: The Joy of Cooking in a Digital World, Fran Brennan writes about the changing nature of recipe exchange and food community. The Internet has stimulated the growth of a large and passionate food community. It allows us to connect to people, places and even ideas that we wouldn't otherwise encounter.  

Opening a browser can open a world of culinary possibilities. So, how do you navigate this new world? 

Thankfully, there are a number of sites that stimulate food community and make navigation of the online food space a bit easier. Amanda Hesser and Merrill Stubs created  Food52.com  to "bring together people who care about food." If Food52 stimulates conversation and creation in the online food community, it's offspring gojee.com provides users with a way to navigate that conversation.

Gojee.com allows users to enter an ingredient they have on hand (or that they're craving), and ingredients they'd like to avoid. After that information is entered, the site suggests recipes that fit your previous specifications. Did I mention it does that with food-porn images of the finished recipe? (Warning: You will walk away from gojee.com with your stomach growling). When you are tempted by a recipe, you click through and end up on the food blog that originally posted the recipe. From what I've seen, there aren't links to allrecipes.com, or more generic cooking sites. Rather, gojee.com directs users to further explore to food community. 

This is why technology inspires me. This type of site helps to foster community engagement and new discoveries online. Between complete strangers. Tell me you're not amazed by that. The most interesting part of gojee.com, though, is not the new discoveries it provides. The most interesting thing about the site is that it makes my life in the kitchen a lot more like my grandmother's. 


See, as a Gen Y'er and daughter of an enthusiastic cook, I was raised in a world where the cooking process went like this: find a recipe, buy ingredients for that recipe, cook that recipe. 

My grandmother, though, and her mother before her, followed this cooking process: look at ingredients you have, find a recipe that utilizes those ingredients, cook that recipe. 

Gojee.com allows, and encourages, cooks to use what they already have. This isn't surprising, considering the concept of using what you have is back in style (we're calling it sustainability now). Think of sustainability in the kitchen as your grandmothers old broach, suddenly appearing--a bit re purposed--in the September issue of Vogue. 

Why am I serenading you about my love of technology while showing you pictures of zucchini, you ask? Well, I had zucchini on hand a few weeks ago--a lot of zucchini. And, I discovered gojee.com, which led me to the 15 minute curried zucchini recipe from fresh 365. Find it adapted below, courtesy new technology. 

Zucchini & Chickpea (Quick) Curry
By Alexandra Rogers, adapted from fresh 365

Ingredients
3 Tablespoons olive oil
1 large (white) onion, chopped
4 large garlic cloves, minced or crushed
2 teaspoons cumin seeds
3 medium zucchini, cut into 1/2" semi circles
8 oz. garbanzo beans (chickpeas)
2 teaspoons ground cumin
2 teaspoon curry powder
1/2 teaspoon turmeric
1/2 teaspoon teaspoon ground ginger
1/8 teaspoon cinnamon
handful of chopped cilantro


Recipe
In a small bowl, mix ground cumin, curry powder, turmeric, ground ginger and cinnamon together. Set aside. 

Heat oil in a large saute pan, over medium-high heat. Add the onions, garlic and cumin seeds and cook for about 5 minutes, until the onions become translucent and start to brown*. Add Zucchini, and spices. Stir to combine. Cook for approximately 6 minutes (until zucchini is tender when stabbed with a fork and begins to brown a bit). Add garbanzo beans and stir to coat with spice mixture. Add salt to taste, and cook for another 5 -6 minutes. Remove from heat, stir in cilantro, and serve with brown rice. Serves 4-5.

*To get vegetables to brown when sauteing, don't stir too often. Extended contact between the hot pan and the surface of the vegetable is needed for vegetables to caramelize (brown). Many cooks struggle with this concept, feeling the must stir continuously so everything cooks evenly and doesn't burn. But, if your goal is caramelization, you need to step back and let the vegetables hang out with the hot pan without stirring for a few minutes.

Monday, October 17, 2011

Happy 1st Birthday, flavorfull!

Today is flavorfull blog's first birthday! One year ago today, I finally launched the blog I'd been talking about launching for at least a year. I've learned a lot about blogging, recipe writing and food photography since then--and I've still got a lot to learn! Still, I think it's important to mark special occasions and this, my friends, is certainly a special occasion for me.


In the spirit of celebration I'd like to do two things. First, I'd like to thank all of you sincerely. It has meant the world to me to know that you are following what I write, cook and photograph. This blog is certainly a labor of love and knowing that somebody is out there reading it (and sometimes even cooking because of it), well, those things make it all worthwhile. So, thank you. Thank you, thank you, thank you.


Next, because no birthday is complete without a rocking dessert, I've assembled some of the public's favorite sweet treats from this blog (based on page views throughout the last year). 


Indulgent Brownies (12/19/2010)

Admittedly, you can't stick a candle in most of these easily. But they all pair well with a glass of champagne (let's be honest, what doesn't?) Again, thank you for reading. I hope you'll stick around to see flavorfull's second birthday, too!


Tuesday, October 11, 2011

Chez Panisse

I first read Comfort Me With Apples, by Ruth Reichl, somewhere around the time I turned 15. Then, I read it a few more times. 

I've wanted to go to Chez Panisse ever since then. In the (fabulous) book, Reichl details her meetings with a many a culinary genius in Berkeley, in the 1970s. She talks about meeting Alice Waters, who co-founded the Chez Panisse in 1971. If none of this is sounding familiar to you, here is something you--as a lover of food--should absolutely know: Alice Waters is one of the founders of California cuisine. Or, to put it another way, she is a big part of why you eat and cook local today. If you're a locavore you should be thanking this woman, this restaurant and of course, foodies living in Berkeley in the 1970s. 
More simply put, if you've ever had a bowl of fruit for dessert at a restaurant, or read ingredients listed alongside their local origins on a menu--you can attribute that focus on fresh, simple and local ingredients to Waters, Chez Panisse, Berkeley and the decade of peace and love. It was a perfect storm that started a culinary movement that continues today.

And I got to go to the restaurant (well, if you want to get technical, the cafe). And, I got to eat (dessert) at that restaurant. And, the waiter explained the process that went into two of the dessert options on the menu, and that explanation took a full five minutes. Heaven. I was in heaven.
I had the creme fraiche panna cotta with mulberry coulis (which was delicious, but not photogenic). My aunt Mary (who graciously hosted me in San Francisco all weekend) had the fig tart with chantilly cream, pictured here. Both were, needless to say, delicious.
I'm not just writing this post to brag to fellow foodies (although, that is part of my motive). I wanted to write about this place because it's inspiring to be surrounded by waiters and chefs who care about every morsel of food, every single ingredient, that goes onto your plate. And because, although there are a lot of caring waiters and chefs, this is still an incredibly rare experience. I also think it is important to acknowledge the start of important culinary revolutions, to better understand how we (as a food culture) came to be.

Thursday, September 29, 2011

Buttermilk Biscuits

This weekend, I read a piece by Mark Bittman in The New York Times, detailing the costs of eating nutritious, home-cooked meals versus eating out. According to Bittman, many Americans explain the high rates of obesity in this country by relaying the "fact" that it's cheaper to eat at fast food restaurants than to buy decent, healthy food elsewhere. Using an especially great infographic, Bittman shows us that this "fact" is really more of a myth. After all, feeding a family of four a meal of potatoes, simple salad and roast chicken costs less than half the price of feeding that same family at McDonald's. 
(via)

So why the nationwide obsession with the golden arches? One reason, among many, is that Americans aren't cooking. Time in the kitchen is seen as grueling or impossible, rather than healthy, simple or relaxing. 

I promise you, these buttermilk biscuits are relevant to the discussion.  This recipe is one of those super easy and incredibly rewarding recipes that makes you wonder why you don't spend more time in the kitchen. I grew up waiting with baited breath for these to come out of the oven, and I have such lovely memories of pairing them with a bowl of soup on cold evenings. It is one of of those recipes, in fact, that made me love cooking (and clearly, I've loved it ever since). Also, the recipe I've posted (and that I frequently use) is from Mark Bittman himself. Because he really is a fabulous guy (and a good tipper, which I learned from serving him when I was a waitress here) with simple recipes and a great writing voice. 

Make the biscuits. Then, if you're feeling the urge for an egg McMuffin, fry up an egg and some bacon, stick a slice of cheddar on top and shove the whole combo into one of these biscuits. Problem solved.
Buttermilk Biscuits
By Mark Bittman


Ingredients
3 cups flour
2 Tablespoons sugar
4 teaspoons baking powder
1 teaspoon salt
1 teaspoon baking soda
1 1/2 sticks of butter, cold 
1 cup buttermilk


Recipe
Preheat oven to 425 degrees Fahrenheit.


In a medium bowl, combine flour, sugar, baking powder, salt and baking soda. Mix together thoroughly. 


Then, cut cold butter into Tablespoon size chunks. Add the butter to the flour mixture and use your fingers to rub the mixture together until it resembles small peas--essentially you use your fingers to combine the flour and butter into a crumb like mixture. 


Stir the buttermilk in with a wooden spoon, stirring until  just combined.


Drop the dough in large spoonfuls onto an ungreased baking sheet and bake for 15 minutes, or until golden.


*If you're interested in this cause, there are quite a few groups across the country that are working to stimulate a renewed interest in the kitchen. From groups that teach children to cook and grow gardens in urban spaces, to groups that put former gang members to work baking bread, there are a lot of ways to get involved.

Tuesday, September 20, 2011

Cremini Mushroom Strudel with Pesto

Last week, there was a frost in Wisconsin. The next morning, I actually turned the heat on in my car. Maybe I'm a little bit of a wimp (it still got to 57 degrees that day), but all I wanted to do all day was curl up in a down comforter and eat something mushroom-based. Because, for some reason, mushrooms solve my cold weather blues. 
So, after perusing the Internet for inspiration, I saw a recipe for a wild mushroom strudel accompanied by arugula pesto. I did not have a wide assortment of mushrooms on hand, nor did I have any arugula, so I improvised and ended up with my own original recipe. 
First, I chopped fresh herbs (using fresh herbs in this is a must, which makes it an excellent dish to make in early fall/late summer, when fresh herbs are still available at markets and in gardens). I also chopped a whole bunch of cremini (or baby portabella) mushrooms. This is not a quick recipe, but you can make it a whole lot quicker by buying pre-chopped mushrooms. I usually frown on that, but this recipe is very good and ever so slightly too time consuming. So, you know, buy the pre-chopped mushrooms. I recognize that you have things on your to do list that trump making dinner, from time to time. Or, if you're really busy and still need mushroom-y goodness, make this very quick wild rice pilaf. I digress.
This strudel recipe is also an excellent opportunity to conquer a fairly straightforward ingredient that many home cooks fear: phyllo dough. You know what I'm talking about--you eat it whenever you go to your favorite Greek restaurant and dream about being able to recreate the spanakopita at home. Maybe even baklava (okay, even I'm afraid of that recipe). But that crispy, flaky dough seems like it would take hours to work with and would be quite finicky. As it turns out, phyllo dough is super easy to work with.   Shh...let's keep it our little secret. For a video instruction of how to do it, view this handy video. My only note on phyllo dough is that if you buy it frozen (and I encourage you to do so), it has to thaw in the refrigerator overnight and on the counter for two hours after that. This is not a recipe to make on a whim. But, it is delicious and warming and somehow brings my two favorite seasons together; pesto tastes like summer, and mushrooms wrapped in delightful pastry taste like fall. This is the perfect September meal. Enjoy!

Cremini Mushroom Strudel with Pesto
By Alexandra Rogers

Ingredients
5 Tablespoons butter
1-2 Tablespoons extra virgin olive oil
2 large garlic cloves, minced
1/4 cup shallots, diced
1 Tablespoon fresh basil, minced
3 teaspoons fresh thyme, minced
1 teaspoon fresh rosemary, minced
24 oz. cremini mushrooms, sliced
6 sheets of phyllo pastry (fresh phyllo pastry or frozen thawed)

Recipe
If using frozen thawed phyllo pastry, you must place the frozen pastry in the fridge overnight, and remove the pastry from the fridge 2 hours before use on the day of. So, by the time you start the rest of this recipe, the phyllo dough needs to be sitting on the counter! 

In a large skillet, melt 2 Tablespoons of butter over medium heat. Once the pan is hot and the butter is melted, add shallots, garlic, basil, rosemary and 2 teaspoons thyme. Let cook for 2 minutes, stirring once or twice.

Add mushrooms (the pan will seem far too crowded, but just go with it). Saute for 15 minutes, stirring occasionally, until very tender. 

Remove the mushrooms from heat, and set aside to cool. Salt to taste (I used less than half a teaspoon). 

Preheat the oven to 400 degrees Fahrenheit. Lightly grease a small baking sheet.

Melt 3 Tablespoons butter in the microwave (this should take a little less than 30 seconds).

Place kitchen towel on work surface and top with 1 phyllo sheet. Brush that sheet with melted butter and sprinkle with 1/2 teaspoon thyme. Top that phyllo sheet with another phyllo sheet, brush with butter and sprinkle with another 1/2 teaspoon thyme. Repeat until the phyllo dough is 6 sheets high. You can find a bit more guidance on how to work with phyllo dough here

Spoon mushroom mixture into the middle of the phyllo dough street. Fold the longer sides over the mushroom mixture (almost like you're wrapping a present), and then roll up the dough, jelly roll style. Roll as evenly as you can, and when complete, place the roll seam down on the greased baking sheet.

Brush the top and sides of the roll with butter and sprinkle with any remaining thyme. Put the roll in your preheated oven and bake for 15-20 minutes, until golden brown all around (including the middle of the strudel). 

Let cool for 3-4 minutes, then slice with a serrated knife to serve. Garnish with fresh pesto (I used 1-2 Tablespoons/slice) and serve. Serves 4.

Thursday, September 8, 2011

Garden Fresh Spaghetti

During a recent visit to the bookstore, I picked up Alone in the Kitchen with an Eggplant. The book features a collection of short essays (which end with recipes) about cooking and eating alone.
One of the first essays I read in the book was by Amanda Hesser. She talked through the meal she made herself one night when her significant other was out of the house. She made a beautiful point about the fact that we often don't cook well for ourselves when we cook only for ourselves. I've definitely gotten home to an empty house and thrown a microwave dinner in more times than I can count. And that's a little funny, if you think about it, since I am obsessed with food and cooking. 
Hesser made a point that cooking a great meal for just you is a way of respecting yourself. I like this logic a lot, and so today I'm offering up a recipe that is meant only for one person (though obviously you can double it if you like) and that capitalizes on the best your garden or green market currently has to offer.
My mother taught me this combination after plucking fresh tomatoes and basil from her garden one day this summer, and mincing some garlic she'd picked up from the green market earlier that day. It is the epitome of fresh comfort food. (Note, do remove the skins from the tomatoes--it's a neat trick to learn, especially because skinless tomatoes produce a sweeter sauce, with no bitter taste coming in from the skins.)
Garden Fresh Spaghetti
By Alexandra Rogers

Ingredients
2 Tablespoons extra virgin olive oil
4 plum or roma tomatoes, skins removed
3-4 cloves of garlic, minced
1/3 cup roughly minced basil
1 serving of your favorite type of spaghetti noodle (usually 1/8 the box)
salt to taste
grated parmesan cheese (optional)

Recipe

Bring water to boil in a medium pot. Once water is boiling, add in spaghetti and cook for several minutes, until it has reached your desired consistency. Pour pasta into a colander to drain the water and set aside.

Roughly dice the skinless tomatoes. 

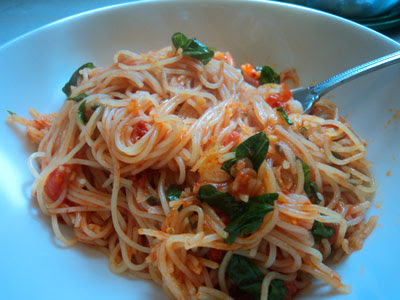
Heat extra virgin olive oil in a medium chef's pan, over medium/medium-high heat. Once the oil is hot, add minced garlic and cook for 2 minutes. Then, add the diced tomatoes and stir to combine. Cook tomatoes and garlic together for about 3 minutes. Add the cooked spaghetti noodles (I used capellini) and stir to coat pasta in tomato sauce. Add minced basil and salt to taste. If using parmesan, add before serving.
Serves 1.

Sunday, August 28, 2011

Pesto

If there is ever a time to make fresh pesto, it's now. Fresh basil is abundant at green markets and grocery stores everywhere, and better yet--it's cheap. Fresh pesto simply screams summer to me. Plus, it's very easy (and quick) to make, and it's one of those dishes that's sure to impress just about anybody you serve it to. Confession: I get pretty impressed with myself every time I make it.
Okay, so here's what you do. Go get yourself some basil. Grab some from your garden, green market or grocery store. You're going to need a lot of it. Note: pesto (without cheese) freezes well. If you'd like to freeze your pesto for use later in the year, simply blanch the basil leaves before putting them in the food processor, continue with the recipe and freeze the finished product in jars).


Grate some parmesan cheese--you'll need it a bit later in the recipe. Toast some pine nuts. During this step, resist all urges to turn your back. You will burn the pine nuts if you don't give them your full attention. While you work, sing along to your favorite music and think about how much you love summer.
The next step is very easy. Throw everything except the cheese into the food processor. Combine it well. Then toss it with some pasta (I like it best with Penne noodles), cheese and vegetables. Or freeze it. Or use it on a salad. Most of all, enjoy this pesto along with the last, ever so sweet, days of summer.
Pesto
Adapted by Alexandra Rogers, from Mark Bittman

Ingredients
4 cups basil leaves, washed and dried
4 medium cloves of garlic
4 Tablespoons toasted pine nuts
1/2 cup extra virgin olive oil
3/4 teaspoon salt
1 1/2 cups of parmesan


Recipe
In a food processor fitted with the blade attachment, combine basil, garlic and pine nuts. Scrape sides of the food processor with a rubber scraper and make sure ingredients are well combined and chopped. Add the olive oil slowly with food processor running. 


It's likely you won't use the full 1/2 cup of olive oil, so add enough to get the pesto to a consistency that is looser than paste but not overly oily. I usually use about 1/4 cup + 2 Tablespoons olive oil in total.


Turn off the food processor and dip a spoon into the pesto. Now, taste the pesto! It will taste like it needs salt. At this point, add a sprinkling of salt (far less than a teaspoon) and combine. This is the "salt to taste" step that can be somewhat confusing. When making pesto, be sure to under salt a bit since you'll be adding salty cheese later in the dish that will carry those flavors through all the way. 


Once salt is added, your pesto is ready to use. Toss with a pasta of your choice and add the parmesan cheese until thoroughly combined and serve. This makes enough pesto to cover 4-5 cups of pasta. 


You can also use the pesto as part of salad dressings or over vegetables. More specific serving suggestions will be coming your way soon!

Tuesday, August 23, 2011

Cocoa Brownies with Peanut Butter Frosting

My mother is the baker, and I am the cook. That has always been the case in our family. My mother is analytical and scientific in her reasoning, and therefore excellent at measuring with care and substituting ingredients and amounts appropriately
    
I'm  more of a creative type when it comes to the kitchen. I create as I go, and very rarely follow a recipe to the dot. Part of my fondness for cooking is the ability to change a dish as I see fit, at any point during its creation. I get frustrated by the patience required by baking, the waiting game and inability to change a recipe once it goes in the oven. The point is, I am not really a baker at heart. This is, I understand, a very odd proclamation to make in the middle of a brownie recipe. Hear me out. 
           
I bake as therapy. You see, I can make a stir fry without much thought at all. But Cocoa Brownies with Peanut Butter Frosting? Those require some concentration. And sometimes, in the midst of a particularly bad week, I need to bake. Because when I bake, my mind refuses to wander. I concentrate only on the task at hand.
     
I know, as a frequent multi-tasker, that I don't need to focus all of my attention on leveling off a cup of sugar with the back of a knife. But, somehow, that's just what happens. 
     
Everything else melts away as I bake, using techniques my mother has taught me over a lifetime.
It's quite hard to feel that anything is amis in the world when you watch peanut butter and butter being  whipped together into a light and fluffy frosting. And if that doesn't do it, sampling peanut butter frosting can make just about anybody smile. (Except a person with peanut allergies. Obviously).

The very act of creating a batter, pouring it into a pan and waiting every so patiently for the result is becoming  slightly more appealing to me. Here's why: earlier this evening I stared at an empty 8" x 8" square pan, and now it's filled with delightful, soul-healing, smile-creating brownies. That is quite an accomplishment, if you really think about it. 

I must use this last paragraph to tell you about the brownies themselves and not just about me. Salty. Sweet. Delightful. I should not have waited to make them for nearly four months.  (I've been waiting since May to make this particular recipe, ever since I saw it on Not Without Salt.) It's no surprise I love them, based on my ongoing (and I might add, very justified) love affair with the chocolate and peanut butter combination (as seen here and here). 
Cocoa Brownies with Peanut Butter Frosting
Adapted by Ashely from Not Without Salt, from Alice Medrich


Ingredients
Cocoa Brownies
1 1/4 stick (10 Tablespoons) unsalted butter
1 cup sugar
3/4 cup plus 2 Tablespoons unsweetened cocoa powder
1/4 teaspoon salt
2 large, cold eggs
1/2 teaspoon vanilla extract
 1/2 cup all-purpose flour


Peanut Butter Frosting
3/4 stick (6 Tablespoons) softened butter
3/4 cup creamy peanut butter
1 cup powdered sugar
pinch salt


Recipe
Cocoa Brownies
Preheat the oven to 325 degrees Fahrenheit and grease an 8" x 8" square pan.


First, put a medium/large pot with a few inches of water on the stove and turn on the heat (to medium) to bring to a simmer. Be sure a bowl can fit inside of it, with room to stir ingredients, and without touching the simmering water. This is basically a makeshift double boiler. It should look a little like this:

Now that you know that bowl fits in the pot the correct way, take it out and put the following ingredients in it: Sugar, Cocoa Powder, Salt. Mix those ingredients together well, with a fork or a whisk. Then, cut the butter into 1 Tablespoon pieces. The idea here is to get them small enough to melt rather quickly (quicker than if you just threw the whole block of butter in there). 


Place the bowl with the cocoa mixture over the simmering water and stir occasionally with a wooden spoon. Once the butter is almost melted (you should see only 3-4 small pats of butter left in the mixture), remove the bowl from the pot (with oven mits on) and let the mixture cool to warm. The residual heat will melt the rest of the butter. 


Once the mixture is no longer hot, add cold eggs one at a time. If you haven't allowed the cocoa mixture to cool, you will make scrambled, chocolate eggs (accidentally). Stir the eggs into the mixture with a wooden spoon, then add the vanilla extract. Once all of this is well combined, add the flour. Once the flour is integrated into the cocoa mixture (read: you can no longer see any flour), stir the mixture 40 times. 


Pour the batter into the pan, spread evenly and bake for 25-28 minutes, until a toothpick or knife inserted into the center comes out nearly clean. Leave to cool on a wire rack.


Peanut Butter Frosting
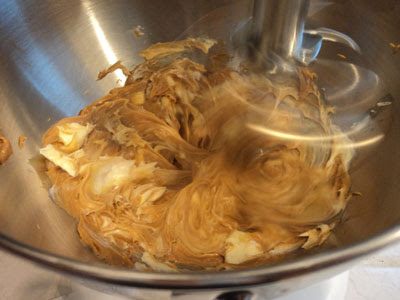
In an electronic mixer fitted with the whisk attachment, cream together the butter and peanut butter. Then, incorporate the powdered sugar (I like to add 1/4 cup at a time). 


Frost the brownies once they are room temperature. Sprinkle very lightly with a pinch of kosher salt. Enjoy. Serves 16 brownies.

Related Posts Plugin for WordPress, Blogger...